Saturday, September 19, 2015

Blast from the Past

One Day as I arrived home from work, my neighbor called out to me and said, "I know you are really into fishing, and I have some old stuff that my father left me."  She then asked if I was interested in having any of it, well of course I was.  She proceeded to hand me this old creel, and I was excited to see what was inside.


Not only the creel itself was cool, but it had an old Kalamazoo fly reel, a Martin Automatic and old multiplier fly reel that all still function.  It also had a very cool canvas covered fly/leader book and some old Pflueger split shots.

Martin Automatic Fly Reel

Old Multiplier Fly Reel

Kalamazoo Fly Reel with Silk Line

Pflueger Split Shots

Talk about a lucky find.  This stuff will only be used for decorations in my cabin, but I am thrilled to have it.

+1 or comment if you think old stuff like this is cool.

Monday, September 14, 2015

Fishing Report - St. Joe River September 13, 2015

Water between Avery and Calder, Idaho is at October levels, and fishing is similar to most years a month from now.  Fish are moving down stream as the water temperature cools and are schooling up in the deeper pools below the riffles where oxygen levels are high.


Early morning and evening, fish are slurping small midges in the slack water.  Mid day they are active in the riffles hitting hoppers and attractor patterns, but will also hit small mayfly patterns in the end of the riffle.  Fishing is still pretty good, and I think will get better as more fish move downstream.

Friday, August 28, 2015

Elusive Fly Fishing Partners with KB2 Custom Fly Rods

Elusive Fly Fishing of South Jordan, Utah and KB2 Custom Fly Rods have reached agreement on a strategic partnership.  KB2 designed and built a prototype custom fly rod that was tested by the guides at Elusive Fly Fishing.  The response from Spencer Morley at Elusive was "...our guides put it to use last week and they love it!"


The rod features a moderate/fast action RX6 graphite blank, with custom cork handle capped on both ends with burled walnut that matches the reel seat insert.  The reel seat hardware is the KB2 TR Series made from stainless steel.  The combination of the beautiful deep blue blank, burled walnut and polished stainless steel give this rod an aesthetic appeal that is matched only by its smooth casting ability, superb line control and durability.  

KB2 will now begin producing these rods for use by the Elusive Fly Fishing Guides and available for their clients use.  Clients will have the option purchase the rod at the end of their trip. 

Other KB2 Custom Fly Rod models will also be available for retail purchase in the Elusive Fly Fishing Shop.  

About Elusive Fly Fishing
Fly Fishing for those of us at Elusive is more than just a hobby or a past time, its our passion. A passion that stems from a love of the Nature, Wildlife, and the Adventure, Words would not do justice. Only time spent on the water and casting in the pristine waters of Central and Northern Utah will give you a sense of why we are so passionate about the sport of Fly Fishing. We challenge you to join us on any of our multiple destinations, and let our guides give you a chance to truly understand the magnetic pull that is Utah Fly Fishing.


Tuesday, August 18, 2015

Building a Custom Fly Rod, Join Me in the Shop - Step 2 Reel Seat Locking Nut

Before I get started showing how I make the reel seat locking nut, as promised here is a picture of the finished reel seat inserts from Step 1 of this series of posts.

The two reel seat inserts built in Step 1 of this Series after 4 coats of Tru-Oil and hand polish
I should point out that you can click on any of the pictures to see the full size image.

Now that the inserts are done and ready to go, I need to start working on the hardware. The first piece that I build is the locking nut.  I do this so that when I make the threaded barrel in the next step, I can insure a good fit between the threads.

I machine all of my reel seat hardware from aerospace grade stainless steel.  Many massed produced reel seats are made from aluminum and plated.  I use stainless steel because it is tougher, more corrosion resistant, and polishes up better.  I start with a piece of 7/8 inch diameter stainless steel. 

7/8 diameter stainless steel is the raw material

The first step is to face turn the end to eliminate the saw cut marks and ensure that I am starting with a square surface. Next I turn the overall outside diameter to size.
Face turning the end
Turning the outside diameter to size


After I have turned the outside diameter to size, far enough back on the bar for however many lock rings I am making, in this case 2, the next step is to drill the center to the proper size for tapping the threads.
Drilling the center to to proper size for tapping the threads

Once drilled, I turn the step diameter, saw the ring off the bar, turn it around in the chuck and face turn the other side to establish the overall length of the locking ring.
Turning the step
Face turning to length

Sawing the part off the bar

Now the locking ring is ready to have the threads tapped.  I do this by chucking the part in the lathe, and running at a slow speed, I feed the tap into the part far enough to create good threads, then reverse the direction the lathe is turning and feed the tap out.


Power feeding the tap to create the internal threads
Once the rings are tapped, I thread them onto a mandrel and create the groove pattern on the outer diameter to allow for gripping when tightening the reel onto the rod.  This process is known as knurling.

After knurling
Setup for knurling


The picture below shows the locking rings ready for the final polish step.


Using a very similar process for final sanding the wood, I start with 120 grit sand paper and work my way up to 1500 for a beautiful polished finish.  All of my hardware is polished to this level.

I start polishing with 120 grit sand paper
I work my way through multiple grits, finishing at 1500


2 polished, ready to go locking rings made from aerospace grade stainless steel
If you missed the previous step where I made the reel seat inserts, you can view it here.

The next step in this series is to make the threaded barrels for the reel seat, I hope to post that process next week if I get it done.  The weekend is coming and the fishing conditions will determine whether I am on the river or in the shop.

I hope you enjoyed this step in the series and will continue joining me in the shop as I go through the entire process of building a custom fly rod.  Feel free to ask any questions or make comments below, and share this with anyone you think might be interested.

Until Next Time,
Karl
KB2 Custom Fly Rods

Sunday, August 16, 2015

Building a Custom Fly Rod, Join Me in the Shop - Step 1 Reel Seat Insert

If you have read my profile you know that I am obsessed with Fly Fishing.  When I am not fishing, there is a good chance I am working on a Custom Fly Rod.  Over the next few weeks or months, I am going to write a series of posts that demonstrate the steps I go through to when creating a custom rod.

First let me welcome you to my shop, it is located in a small garage at my house.

Welcome to the KB2 Custom Fly Rod Fabrication Shop

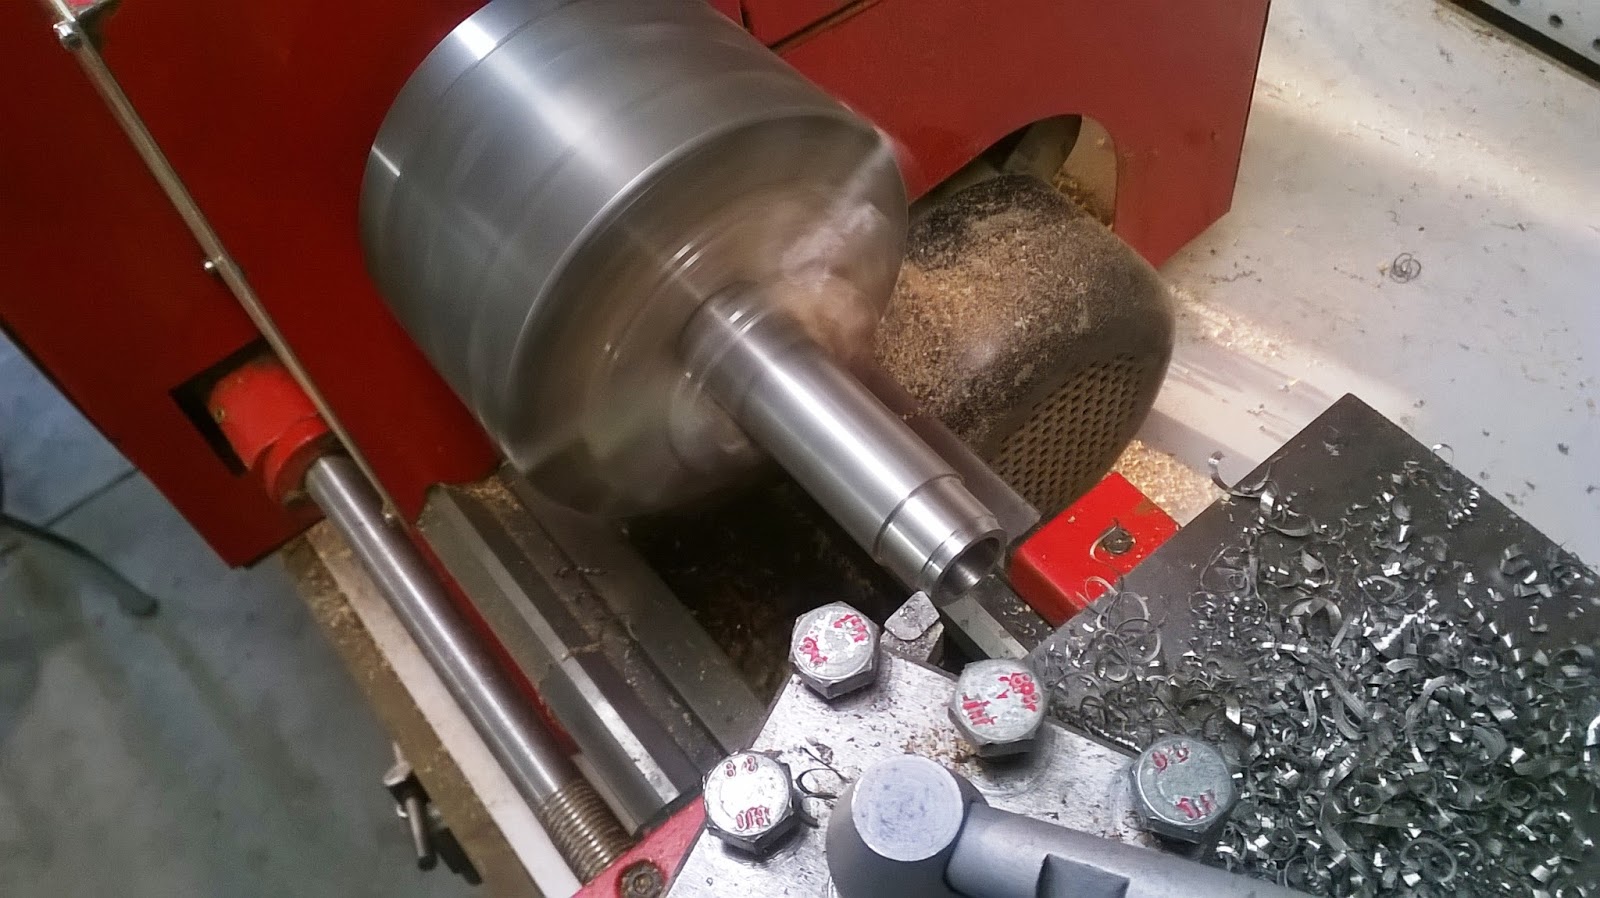
Many custom rod builders just buy components and do the assembly, wrap the guides and apply the epoxy finish.  I am one of the few who builds many of the components myself.  In a typical build, I just buy the graphite blank and the guides, and build the rest from scratch.  Today, I built two reel seat inserts.  This is always my first step as I need the reel seat assembly before I can start the actual work on the rod.  Something else I should point out is that I am a machinist, you may notice that I work the wood on a metal lathe, I don't know how to use a wood lathe, so I machine the wood the same way I do metal.

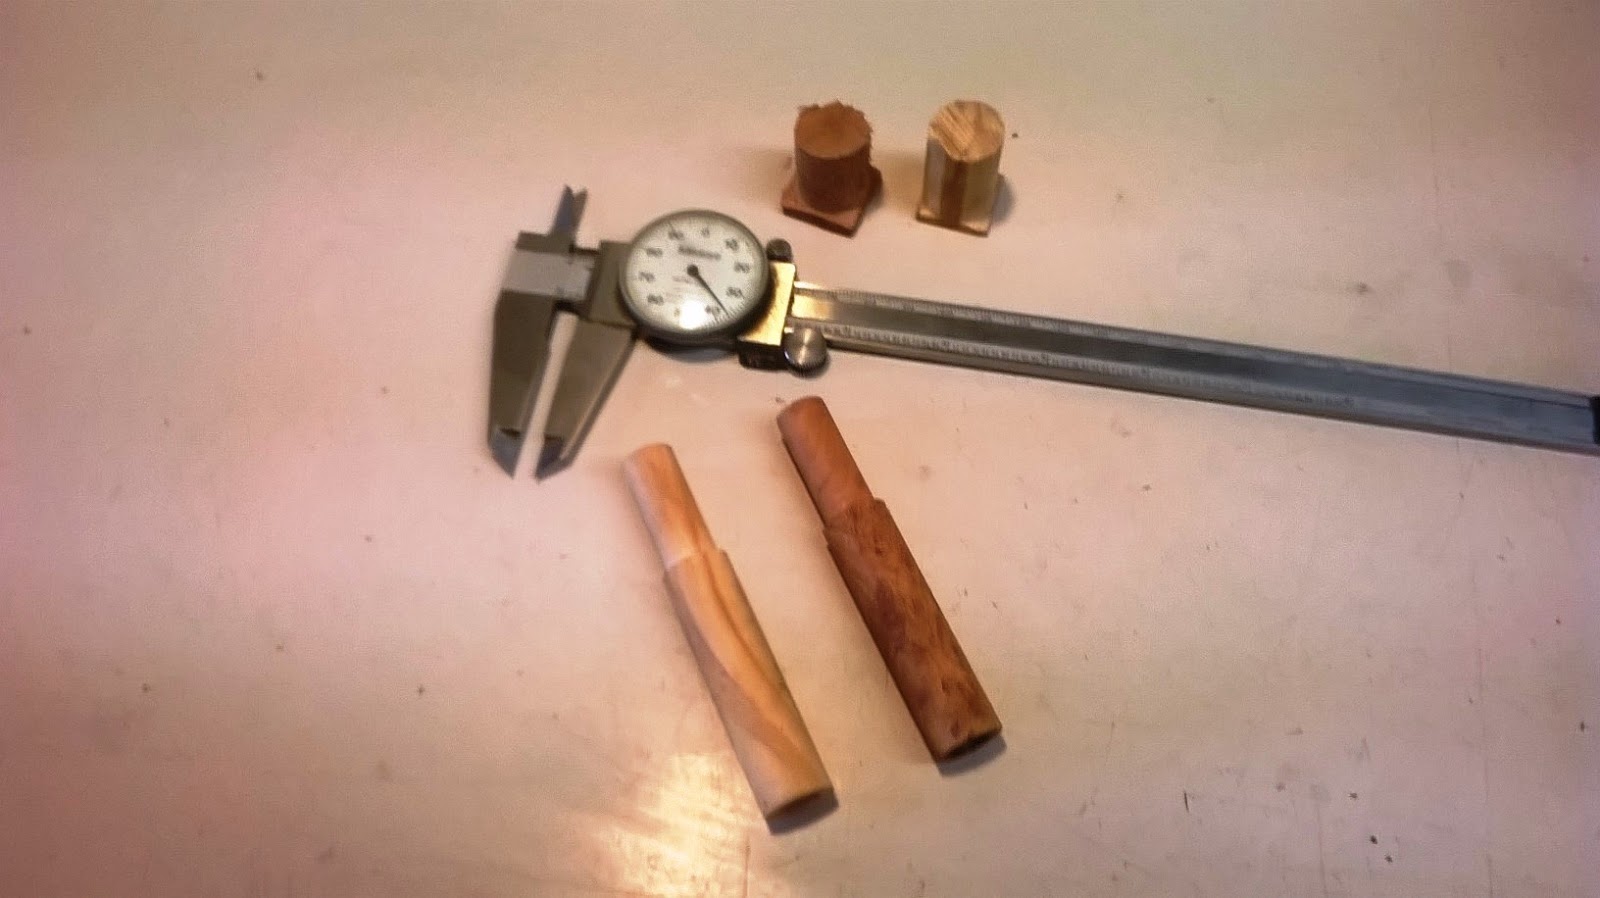
The two wood blanks I have selected today are Italian Olive, which is the lighter colored one on the right and Maple Burl, on the left.  I have worked with many different woods and other materials for reel seat inserts including deer horn.  Italian Olive is a great wood to machine, however Maple Burl can be a little more difficult as it is soft and tends to tear.


I drill a small hole for the drive screw
Next I insert the drive screw
Since the blanks that I start with are square, I need a way to grab them in the lathe to turn them round, I use a drive screw for this.


Once I get the drive screw installed, I can begin to rough turn the blank to .750" in diameter.  I tighten the chuck on the drive screw and position a center in the other end for support while I turn the blank.

Drive screw in the chuck
Carbide tooling to turn the square blank round

Rough turned to .750 diameter

Here are the two blanks rough turned to .750 diameter


The next steps shown in the 3 pictures below are to cut off the excess, face turn the ends to establish the finished overall length of 3.625 inches.

Face turn to length
Saw off excess
Length established


After I have the blanks rough turned and the length established, I need to drill the through hole. These two are drilled .375 diameter for 5 weight rods.  I drill the correct size for a snug fit on the blank, so I don't have to use any build up material to make them fit.

Drilling .375 diameter hole
Both blanks drilled and ready for finish turning
The final machining step is to finish turn the outside diameter and turn the step for the threaded barrel.  

 The picture on the left shows the Maple Burl insert being turned to the final diameter.  The one on the right is the Italian Olive insert having the step for the threaded barrel turned.


Here are the 2 blanks ready for sanding
The final step in the fabrication shop is to finish sand the blanks.  I accomplish this by holding the blank in the lathe by the step turned end and spinning at 1200 rpm's. I hand sand the inserts, working my way from rougher to finer sand paper.

I start with 60 grit sand paper

I work my way up to 1500 grit sand paper

Here is the Italian Olive Insert after finish sanding
Here are the two inserts after finish sanding and ready to go inside to the finish bench

 After the final sanding, the inserts are ready for the finish to be applied.  I do this in my finish room which is in the basement of my house.  The dust created in the shop makes it difficult to apply a clean and smooth finish, so off to the house we go.

I use Birchwood Casey Tru-Oil for the finish

Here is the Italian Olive Insert with the first coat of Tru-Oil


I actually apply 4 coats of Tru-Oil, allowing it to dry 24 hours in between.  As you can see the Tru-Oil brings out the luster and color of the wood.  Tru-Oil is commonly used on high end gun stocks and is a very durable finish.

The next post I will begin making the stainless steel reel seat hardware that will go with these two inserts, you will also be able to see these two inserts with all of the coats of finished applied.   I hope you enjoyed this post, and will check out the rest of the series as I get them posted.  Feel free to comment or ask questions below, and share with anyone who you think might be interested in my work.

Until Next Time,
Karl
KB2 Custom Fly Rods


Thursday, August 13, 2015

Catch and Release on Fish - No Limit on Litter

The waters that I fish are almost all catch and release.  Even if they weren't, I would not keep most, as I really don't like to eat fish.  However, I have committed to myself that there is no limit, and a must keep on all litter that I find along the way.  I use the back pouch of my fly vest that was originally designed to hold fish, to store the trash while fishing.  I do cuss and grumble about the idiots that left it there, but feel it is my duty to pick it up as opposed to just walking by.  I have picked up many items along the way, shoes, clothing, kids toys and countless amounts of just plain litter.  I now count this as part of my fishing trip success.  Last time out I caught 12 cutthroats and collected an old diving mask, 2 Styrofoam worms containers and a beer can.  Maybe we should all count this as part of our trophies when on the water.  What do you think?


Monday, August 10, 2015

Matching the Hatch in Fast Water

The majority of my time spent fishing is on the St. Joe River in North Idaho and its tributaries.  Over the years I have discovered that my most productive water is usually the riffles and chutes leading into a deeper hole.  When the cutthroats are in a feeding mood, they seem to move the the front of the hole and even further up into the riffles and diamond water above.  I catch a lot of fish in the faster moving water.  When the fish are there, and an insect is drifting naturally at or near the surface, the fish do not have much time to decide to strike or not.  I use this to my advantage. Because their decision making time is so short, I believe the most important aspect of trying to match the insects in the water with an artificial fly, is to get the size right.  Many times this is enough to motivate a fish to hit your fly.  The second most important aspect is the color, especially the tone, light to dark.  I believe tans and grays are similar.  Black, brown, and darker colors also appear to work the same.  So try and match the lightness or darkness of the naturals.


The actual silhouette of the fly is of little importance in the faster water.  By this I mean a trout in these conditions will hit a darker colored mayfly imitation when darker colored natural caddis flies of the same size are in the current.  On the St. Joe in the last few years the 'Purple Haze' is being used more and more effectively.  I have never seen a natural insect that this pattern is trying to imitate. However, in swift water conditions, I believe that fish will mistake this for any darker colored natural insect of similar size if they are hatching.

Several weeks ago my friend and I were fishing one of my favorite holes and I moved up into the riffles above when I saw fish rising.  I was able to capture a larger than normal chironomid that was about the equivalent size of a #16 dry fly.  All of my chironomid patterns I had with me were #18 and smaller.  So I tied on a #16 BWO pattern and began catching fish.  When my friend asked what fly I was using, he was surprised when I told him.  He commented "a Blue Winged Olive should not be working, they are not hatching."  I explained to him that I knew that, but since we where in the faster moving water of the riffles, the size and color of the fly was enough to trigger a strike when the fish only have a split second to decide.

I would be curious to know if any other fly fishermen have seen the same thing when fishing faster water.  Comment below and let me know your opinion.